
My shed was full of junk from the dump's wood pile, the scrap metal bin, yard sales and my dad's "save this for Deidre" pile. This roundup is everything I turned it into. There are signs, planters, porch decor and some furniture makeovers, and almost all of it cost me nothing except a bit of paint.
If you've ever walked past a broken shelf or a rusty bucket and thought "I could do something with that," this one's for you.
My Go-To Supplies
Homemade chalk paint in black and white, plus a few paint testers (I'm loving yellow right now)
Candle wax for chippy, distressed layers
Mod Podge Matte for reverse graphic transfers and decoupage
Polycrylic sealer, and an outdoor version for anything going outside
80 and 220 grit sandpaper, a scraper and a heat gun
Pickling salt, hairspray and white glue for chippy and crackle finishes
Gorilla Glue and E6000 for putting odds and ends together
My favourite Wooster paintbrush
Signs From Scrap Wood
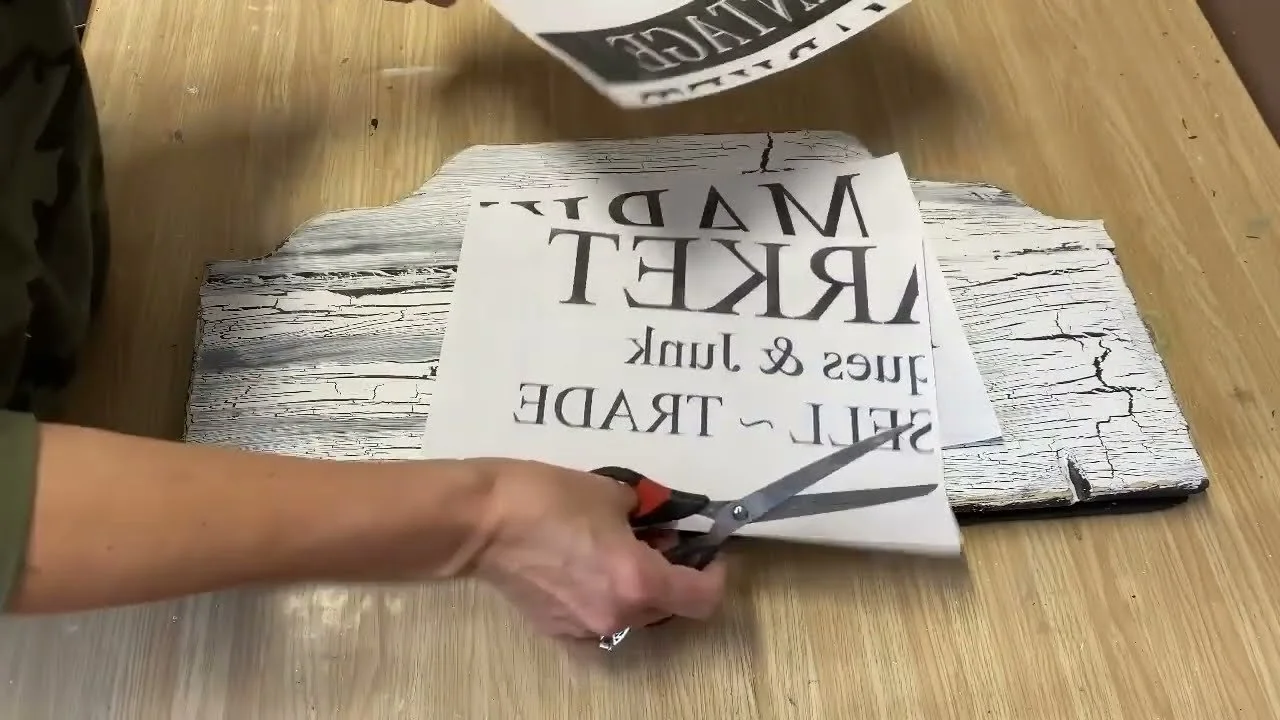
Natural wood shelf sign: I took apart a big clunky shelf and used one end for a simple sign with a Polycrylic transfer. It dries faster than Mod Podge, so it's ready in a couple of hours.
Big crackle farmhouse sign: The other shelf end and a rustic chunk of wood were screwed together, then layered with candle wax, black chalk paint and a glue crackle finish. Tip: use only a little water when you rub off the paper on crackle, or the glue reactivates.
Hardware display sign: I used all those old screws and bits of hardware I'd saved from other projects to dress up a rustic farmhouse sign.
Garage sign: A cut-off from a cabinet door, with chippy paint and a reverse graphic. It makes a great gift for Dad or Grandpa.
Table leg sign: I hung new pine from an old dump table leg with a glass ball foot using a rusty chain. I dinged up the wood with a hammer and used hairspray crackle to make it look old.
Chair back sign: The top rail of a broken chair from the wood pile became a sign that fits right into its own frame.
Old door board and thrift plaque: I painted a worn plaque black and decoupaged a coffee-stained, crumpled printout on top.
Chippy yellow tea sign: I layered candle wax, black and yellow paint on a free piece of salvaged wood for real texture.
Pine sign with a clay accent: I sanded off the glossy finish, filled the holes, and glued on a piece I made with my DIY silicone molds and air dry clay.
Crate end "cutting board": I sanded it smooth and did a transfer with a thrifted CD label sheet. It's for decor only, not for cutting.
Salvaged wood signs sell really well, so always keep an eye out for interesting scraps. For the basics, see my DIY wooden signs post.
Garden & Porch Decor
Frying pan garden sign: I scrubbed an old aluminum pan, added a graphic, and stuck the handle right into the garden.
Lantern bottom hanging planter: The ornate base of an antique lantern plus a chain from the scrap bin makes an easy hanging planter for ivy.
Sap buckets: I gave them two coats of chalk paint and applied a napkin using a plastic sleeve and water, which cuts down on wrinkles and bubbles. Seal with outdoor Polycrylic.
Dry brushed rusty bucket: A quick dry brush of white latex paint and a graphic. A few rub-offs only add to the farmhouse look.
Faux cement planter: I took the handles off and used the salt and pepper paint technique for a grainy stone finish, then sealed it with spray so it keeps that cement look.
Sun bleached lanterns: I perked them up with white spray paint and slipped in a tin can decoupaged with a napkin.
Rusty lantern: I sealed the rust with engine enamel instead of painting it, so it keeps all its character.
Chippy birdhouse: Sprinkle pickling salt into wet paint, then sand. I added an old door pull and drawer pull as embellishments.
Junk planter: A wire basket, a wooden trivet and an old table spindle, spray painted black and put together.
Solar light jar: Prime a glass coffee jar, spray it with textured stone paint, fill it with gravel and glue a dollar store solar light on top.
Pallet wood plant stands: Wire brush the boards, paint them with latex, sand, then wipe on stain. The stain won't stick to the paint, so you get beautiful contrast. I set them into chippy yard sale stands.
Kitchen & Home Decor
Pot lid hanger: I layered red and turquoise over an old pine cabinet door with salt for chippiness, then screwed on four mismatched pot lids. It's great for tea towels, utensils or coats.
Teapot herb planter: A black spray painted teapot and candlestick holder, glued together with a reverse graphic and filled with fresh herbs.
Sewing machine drawer: I glued two candlestick holders and a little glass knob onto an old drawer my dad saved. Cutting the E6000 tube in half lets you get the last of the glue out.
Baskets without handles: Taking the handles off old baskets and adding small hardware handles makes them look so much less dated.
Spindle votive holder: A burn pile spindle cut flat with a votive glued on top.
Farmhouse kitchen basket: I painted a dated Easter basket from the dump black, then chalk paint, sanded it hard and added a graphic.
Furniture Makeovers
Chippy teal chair: I kept the original worn paint, lightly sanded with 220 grit to bring up the lighter teal, and tidied the base with black.
Bare wood chair: I asked at Home Depot what to use, then went with linseed oil and a clear penetrating oil finish to bring the dry wood back to life.
Pegboard craft station: A dump dresser's mirror frame filled with pegboard, so I have a spot for all my supplies.
Shabby chic wall cabinet: A dump cabinet with a chair back on top and spindles cut down for legs, painted black then white, sanded, with floral napkins decoupaged on the back.
Layered pine cabinet: Black first, then the Vaseline method and hairspray crackle with yellow and turquoise, graphics on the door and a patina on the handle.
Yellow dump bench: I kept the chippy paint, scraped off the loose bits, stained the top and added a quote with a reverse graphic transfer.
Gift wrap table: One step paint on the base and spindles, dollar store gift wrap decoupaged and ironed onto the shelves, then sealed with engine enamel for durability.
My Best Tips
Start with your darkest colour. When you sand at the end, it peeks through and looks authentic.
Wherever you put candle wax, the next paint coat won't stick. It's the easiest way to get chippy layers.
Make sure each coat is completely dry before the next, especially with the salt technique.
Use an outdoor sealer for anything going on an open deck or in the garden.
Pick smooth wood for reverse graphic transfers, and remember to reverse your text before printing.
Tuck interesting finds away. Sometimes the idea comes months later.
Want more? Try my binge-worthy upcycling roundup or my epic thrift store makeovers, and learn my homemade chalk paint recipe.
If you give it a try, I'd love to see how it turns out! Tag me @OurUpcycledLife on social media. I always enjoy seeing your beautiful creations. 💕 Until next time, happy crafting!
